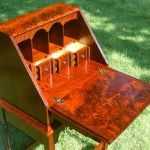
LIKE IMPACT FOR WOOD than STAIN

MUCH MORE POP! TRANSPARENCY
OF COLOR
!
SO MUCH BETTER THAN WOOD
STAIN!
Wood can be colored with chemical or natural stains or with aniline dyes and these comes in many shades. You can blend those dyes, using mixed colors so that the shade DEEPENS at the edges. Piece can be accented with gilt, liming wax, or patinating wax in an unlimited number of variations. If you want to know everything there is to know about coloring wood, get a copy of the book, Coloring Techniques For Woodtrurners, by Jan Sanders. It may be out of print, but there should be an AAW Chapter library or a fellow woodturner with a copy that you can borrow.
See what these woodworkers mean when they refer to the glow of aniline
dyes:
http://www.edswoodturning.com/2010/09/20/just-a-quick-note-on-dyes-for-wood/
The following is a summary of the techniques, and a discussion of the areas that can cause problems. The presentation describes a piece that is first dyed and then the grain is accented with either a gold cream, or a white liming wax. Either the dyeing or the accenting can be used separately for different effects. Or you can use varnishes as a final layer to give shine.
Dyes and Stains available online.
See:http://www.constantines.com/behlensanilinedyepowders.aspx
Traditionally, the difference between a dye and a stain is the size of the color particle. Stains are very large insoluble particles that are worked into the open spaces on the surface of the wood. Caveman substances. Dye particles are near molecular in size, are soluble, and occupy the open spaces in the cellulose structure of the wood. For a comparison, if the dye particle were the size of a BB, then the pigment particle would be the size of a pickup truck. Since it is in the wood, the dye is more transparent and doesn't mask the wood grain and texture like pigments that remain on the surface.
These definitions can get confusing because there are prepared stains that contain dyes, and wood colored dyes can be used in place of the traditional stains.
Dyes are classified by the liquid that is used as the solvent - water, alcohol, or oil. The water-soluble dyes are ideal for wood turnings because of their color brightness and clarity. They are more colorfast, easy to apply, can be removed from our hands with repeated use of soap and water, and are compatible with the oil and lacquer finishes. They are also very slow drying, making it easy to apply an even coloring without overlaps. Colors can also be easily blended through a transition, such as a yellow/green/blue, or blue/purple/red.
The water will raise the grain of the wood surface, but this is a minor problem with a simple solution. The aniline dyes distributed by Craft Supplies are made by Libron and they are of good quality for about $3.00 per ounce.
While not raising the grain, alcohol and solvent soluble dyes dry too fast to apply a primary color over large areas without having visible overlaps. This faster drying makes them a better choice when a sharp color separation is desirable such as for grain painting, stenciling, or artistic forms.
Blackberry juice, burgundy wine, and boiled English walnut husks (Black walnut trees produce this mid summer,) are sources of natural dyes. I have not had any success using Rit® or similar dyes made for cloth. These dyes are a heat-setting type and must be boiled into the material being dyed, and I have never found boiling to be a good technique for finishing wood.
A third method for coloring wood is by a chemical reaction of various solutions with the wood itself. An example of this technique is that of Ebonizing. The reaction of the tannins in the wood with a solution of vinegar and dissolved iron particles will impart a black color to the wood. Other reactions will create other colors. These techniques will not be a part of this discussion.
Mixing The Dye Solution
The dye powder should be dissolved in warn (150ºF) distilled water - ½ ounce of dye in ½ pint of water is a useful ratio that will yield a strong solid color. The dye solution can be diluted later if a more transparent color is desired. If you don't have a scale, then one (1) level Tablespoon is close enough. Mix well, cover the jar, and let it cool. Strain the solution to remove any sediments before using.
Selecting The Wood
Fine hardwoods in antique
pieces that you refinish
from
scratch will get
a glow they NEVER
had.
Any wood can be dyed any color. The wood should be bleached before using the light or transparent colors such as the yellow or red. If the grain will be accented, then use a strong open grain such as Ash or white oak. See what the Japanese do with their Samurai Sword boxes The wood has the most extraordinary grain of any wood and they use color impregnated lacquer, many layers of it, on top.
Dyeing The Wood
Dyeing the wood will take a total of about 30 minutes, spread over
a time of 5 to 7 days. An overnight wait every time the wood is wetted
will insure that it is thoroughly dry for the next step. The following
discussion is based on a solid uniform coloring of the turning.
Day 1 - Preparing The Wood
The wood surface has to be smoother than for any other finishing technique.
The dye will accent every surface blemish, including torn grain, tool marks,
and sanding scratches. But, natural defects and bug holes can add character
to the wood. The wood should be bleached before applying yellow or red.
The wood bleach made by Kleen-Strip® will give good results without
a lot of effort.
Wet the surface of the wood with a damp paper towel while it is spinning on the lathe. Set it aside until the next day so that it is thoroughly dry. Surface dry isn't good enough.
Day 2 - Final Sanding & First Dye Coat
Sand with 600-grit or steel wool to just remove the surface fuzz that
was raised from the water. Sand in both directions to get a really smooth
and whisker-free surface. Any more than this will expose a new surface.
With the piece in the lathe, lightly moisten the wood surface with a damp
paper towel, and then apply the first coat of dye. If the end color will
be black, this first application should be a dark blue. This will color-correct
the black, and prevent the formation of a bronze glaze on the surface.
A sponge brush is an excellent applicator. Dip the handle in the dye to
identify the brush after using it, rinse it out, and save it for the next
time.
Spin the wet turning in the lathe and remove all excess liquid with
a paper towel. Be careful not to throw dye around the room.
Day 3 - Second Dye Coat
Put the piece in the lathe and burnish the surface with a dry paper
towel. This removes any loose dye from the surface, and should be done
after every application. Moisten the surface with a damp paper towel and
apply the second coat of dye. If the end result is to be black, then this
is the first coat of black dye. If the final color will be the same as
the first, then this will be the final application of dye. Burnish the
surface with a soft paper towel while it is still wet.
Day 4 - Third coat of dye
Repeat Day 3 if the final color will be black. If not, go to the next
step.
Day 5 - Enhance The Grain
Buff the dyed surface with a clean paper towel. The same technique
is used for all accenting colors. We have not put any finish on the wood
because we want the grain to be open to be filled with the coloring wax.
A coat of Danish Oil can be applied and allowed to dry before continuing.
This will seal the dyed surface without filling the grain. Do not use a
film finish such as lacquer or a varnish.
Spread the grain accenting color over the entire surface. I like to
use gold gilt cream or white liming wax. Fingers are the best applicators.
Let the piece sit for about 15 minutes. Then spin the piece in the
lathe and remove the excess color from the surface with a soft cloth that
has been dipped in a liquid wax or an oil/varnish wiping finish. Follow
this 2 or 3 times with a clean dry paper towel. When you are finished,
you will know why the earlier warning about tool marks and torn grain.
Set the piece aside for 48 hours.
Day 7 - Applying A Finish
We have several choices of finish. We can apply a liberal coat of paste
or liquid finishing wax to the entire surface. Spin the piece in the lathe
and wipe the surface with a clean towel while the wax is still wet. DO
NOT use a hard finishing wax stick because it will abrade the dyed surface
and remove the dye and grain enhancing wax.
Or, we can spray on a light coat of Deft®.
Or, we can apply a Tung Oil finish such as Waterlox® or Gillespie's®.
Use Watco if there is nothing else available. Do not wait; wipe it off
immediately with the piece spinning in the lathe. Done! Hold it up and
admire!
Some Things That I Have Learned (The Hard Way)
They may be a bit more expensive, but Libron® aniline dyes are
excellent. So are all of their other products. Check out their web site
at http://www.woodfinishsupply.com/ . Craft Supplies sells Libron dyes.
Whenever I refer to a soft cloth, I have found Viva® to be softer
and more absorbent than other brands.
Use distilled water because the metallic salts and chlorine in tap
water will change the color and reduce the shelf life of the dye solution.
The shelf-life of the dissolved dye is from 6 months to a year. Store
it in a closed Mason jar in a cool dark place. Throw it out when a bronze
colored film forms on its surface.
NG SECRETS" INDEX
© 2002 - 2009 by Russ Fairfield.d.
http://www.woodmagazine.com/materials-guide/finishes/aniline-dyes/
http://www.woodfinishsupply.com/PLaniline.html prices on oil dye
ANILINE DYE Water Soluble
Information and Application Guidelines:
The water soluble anilines are best for light fastness, transparency of colour, accentuating the wood grain, ease of application, lack of lap marks and use under lacquer. They will not leave a muddy surface. They can however raise the grain and create a fuzzy look. Prior to staining lightly sponge the surface with clean water or a dilute solution of dye. Sanding off the raised fibers with fine paper after thorough drying will eliminate this problem. Proper surface preparation is well worth the effort. For best results apply with a sponge, soaking areas thoroughly. Squeeze out the sponge and remove the excess stain, leaving a uniformly damp surface. Let the surfaces dry 12-24 hours before proceeding with polishing or finishing. (It is important to have the depths of the wood dry not just the surface)
Hints & Tips:
1 - For consistent results use distilled water & mix powder by
weight.
2 - Use plastic straws to pipet (by covering the end with your finger)
measured amounts of liquid into a glass container to make small test batches
(Keep Notes) then multiply the test batch by an appropriate measure to
arrive at a working solution volume.
3 - Remember that the wood tone will show through & blend with
the dye colour for your final result. If you are trying to match an existing
commercial dyed product, there is a strong possibility that the wood was
bleached to remove all colour prior to the dye process; if you hope to
replicate the same result, bleach with a two part wood bleach first then
dye, you will save hours of frustration.
4 - The water soluble anilines are best for light fastness however
different colours are more resistant to fading than others. The following
steps are recommended if you wish to assure the best in fade resistance;
Use Fresh Solutions, thoroughly saturate the wood with dye 2 or 3 times.
Top coat with At Least a sanding sealer, and better, finish coats containing
UV (ultraviolet light) inhibitors.
TO MIX: Dissolve aproximately (1 oz. in 1 Pint) or (1/4 Lb. in 2 Quarts)
or (1/2 Pound in 1 Gallon) of hot (not boiling) water. Add the powder gradually
to the water while stirring or agitating. Mix and store in plastic or glass
container. For a darker tone, add powder; for a lighter tone use less powder
or add water. Cool to room temperature prior to use. Apply using sponge,
brush, or cloth. Dye may be mixed, (In its liquid form), to obtain desired
colour, shade, or tonal result. Keep notes and make a test on a scrap of
the same wood as to be dyed, evaluate colour after wood is dry. Van Dyck
Crystals (genuine walnut crystals) make an excellent and inexpensive base
from which to mix wood tones.
STORAGE: It is best to mix what will be used within a short period
of time. Store in a dark cool place, tightly capped for up to 6 months.
------ KEEP OUT OF THE REACH OF CHILDREN ------
AVOID BREATHING POWDER, and AVOID CONTACT WITH SKIN OR EYES
Wash Hands thoroughly with soap and water Immediately after use.
ANTIDOTE: EXTERNAL, flush thoroughly with fresh water
INTERNAL, give magnesia, chalk or whiting followed with emetic (induce vomiting) [Tablespoon of mustard and a Tablespoon of warm water] Call a physician. Best is not to let kids, dogs or cats into the work room!
DO NOT TRANSFER TO UNLABELED BOTTLES OR CONTAINERS
WARRANTY: Wood Finish Supply and/or the vendor assume no responsibility
expressed or implied,
for the results of or the misapplication or misuse of these materials.
VAN DYCK (Vandyke) CRYSTALS GENUINE WALNUT CRYSTALS
To make an inexpensive and useful water stain VAN DYCK CRYSTALS are dissolved in HOT water (not boiling) to obtain colours from dark brown to a light tan. The quantity of crystals can be varied to obtain the desired colour; or make a strong stock solution, then dilute a portion with hot water for lighter tones. To assure even results strain through muslin or clean cotton cloth to eliminate any possible sediment. (The addition of a tablespoon of Technical Ammonium Hydroxide to a quart of solution will increase the penetration into the wood and slightly darken the colour. Keep the ammonia off your hands and avoid breathing the fumes.) (Use water soluble aniline dye in mixed liquid form to enhance or tone towards warm or cool colours.)
Always make test for results on a scrap piece of the same wood, or on
the under side of a piece of furniture, and evaluate after dry. Wear rubber
gloves, and apply with sponge brush or clean cloth. Allow to dry from 12
to 24 hours, depending on atmospheric conditions, before proceeding with
your finishing schedule. Water soluble dyes will not bleed into solvent
based finishes. Keep notes so the colour may be duplicated in the future.
* * * * * * * * * * * * * * * * * * *<=== BACK TO THE FRUGAL TIPS and CHEAPO LIFESTYLE WEBPAGE
THE ACTIVIST should utilize the internet and become a POSTER which is what ANITA SANDS HERNANDEZ, Los Angeles Writer, mother of 4 and career Astrologer ---does. She finds 'telling' articles, posts them and POSTS them at her website then sends the URL out to her TWITTER friends, her FACEBOOK readers and to her extensive EMAIL lists, --to people who she's noted are thinkers, do-ers and are likely to pass the information on. The themes? HOLISTIC HEALING without doctors, but also for CATS AND DOGS , TRUTHS the GOV WILL HIDE & NEVER TELL YOU, The FUTURE, WHAT'S COMIN' AT YA! FRUGAL LIFE STYLE TIPS, and ALL the things you'll need to do to SURVIVE the COMING GREAT DEPRESSION, Also cottage industries galore, like ARTISANRY FOR EXPORT, EARN EUROS... (and more.. see the dozen themes below) Anita is at astrology@earthlink.net ). Get a free natal horoscope "my money/future life" reading now + copy horoscope as a Gif file graphic! No smarter, more accurate career reading out there!
<=== BACK TO THE FRUGAL ARTISAN IMPORT/ EXPORT TYCOON AND HIS "LINE OF MERCHANDISE THAT IS HOT NOW"
<=== BACK TO THE HOLISTIC INDEX PAGE, HOW TO LIVE 150 YEARS
<=== BACK TO TRACKING THE ECONOMY, an INDEX PAGE
<===BACK TO MONEY SECRETS ONLY STREET SMART EXPERTS KNOW
<=== BACK TO DIRTY SECRETS which the GOV DOES NOT WANT YOU TO KNOW
<===BACK TO THE SECRETS OF THE OLIGARCHS, THE EMPIRE INDEX PAGE
<=== SHOW ME THE FIX INDEX PAGE.
<== SHOW ME THE HAPPY R)EVOLUTION PAGE
<=== BACK TO "GUERILLA CAPITALISM" -- THE SOLUTION!
<==== BACK TO THE "VITAL SIGNS OF A DYING ECONOMY" the "FUTURE" WEBPAGE
<==== BACK TO THE WALL STREET MELTDOWN WEBSITE, with "WHAT TO DO TO SURVIVE" TIPS
<=== BACK TO ENRON PLANET, the DOOMSDAY SCENARIO!
<====BACK TO THE HOLISTIC GOURMET, BON MARCHE
<=== BACK TO THE GLEENERS PAGE
<== BACK TO THE FUTURE INDEX PAGE
<=== BACK TO THE GENTLEMAN FARMER'S GARDEN INDEX
<=== INVESTIGATE DOING DRIP IRRIGATE- LINES in PUBLIC GARDENS as a CHARITY
<=== BACK TO "DONE WELL, ACTIVISM IS A DELIGHT and IT CREATES CAREERS for YOU as well as PLANETARY EVOLUTION"
<=== BACK TO THE MALTHUSIAN INDEX PAGE
<===BACK TO THE PHILOSOPHY INDEX PAGE
<=== BACK TO THE LUCK IN LOVE WEBSITE
<== BACK TO THE PROPAGANDA STUDIES WEBSITE, HOW GOV LIES TO YOU
<=== BACK TO ALL POINTS OF THE COMPASS POLITICAL PHILOSOPHY TUTORIAL
<=== BACK TO JERRY'S REFRIGERATOR & the Tin Foil Hat Collection of CONSPIRACY THEORIES!
<====BACK TO THE FREE MONEY WEBSITE
<==== BACK TO THE HARD TIMES WEBSITE
<===== BACK TO THE POVERTY INDEX PAGE
<==== BACK TO THE "TIPS to SURVIVE THE FUTURE" INDEX PAGE
BACK TO THE "FIX YOUR FLAGGING AMBITION" SEMINAR
<== BACK TO THE SNOOKERED INDEX PAGE
<===BACK TO THE REALITY 101 SEMINAR FOR TEENS
<==== BACK TO THE SHOW BUSINESS PAGE, ARCHIVE, SEMINAR, WHATEVER YA WANNA CALL IT
<====HOW TO TINKER WITH OTHER PEOPLE's BRAINS
<====BACK TO THE NEW AGE EMPOWERING INDEX
<===BACK TO "HOW TO MERCHANDISE YOURSELF" INDEX
<===BACK TO THE ALL ABOUT TAXES INDEX PAGE
<=== MEET ANITA SANDS WHO WRITES ALL THESE ARTICLES
<=== TAKE ME TO THE HOLISTIC PET, HOW NEVER TO NEED a VET
<=== BACK TO THE TRUTHS ABOUT DENTISTRY THAT WILL SAVE YOU 100 THOUSAND!
<=== BACK TO THE SNOOKERED WEBPAGE, HOAXES WE HAVE ALL KNOWN
<===BACK TO EVERYTHING YOU NEED TO KNOW ABOUT WEB STUFF (for dummies) so you can make your own website.
<=== BACK TO THE CONVERSATION INDEX
<=== BACK TO REAL ESTATE BUYING FOR THE POOR PERSON. IT CAN BE DONE!
<===== BACK TO THE
PHILOSOPHIC DIFFERENCES INTERPRETED WEBSITE.
<=== BACK TO "HOW TO MARRY A
BILLIONAIRE" A 120 CLASSROOM SEMINAR that teaches THE SUPER BEAUTY how
to GIVE UP JOCKS, SACRIFICE HERSELF AND SAVE THE WORLD
<===BACK TO THE
NUKE ME, I'M IMPERISHABLE! A WEBSITE